魔镜项目地址:https://github.com/MichMich/MagicMirror
材料:
所需要准备的东西:树莓派(2B 以上)、显示屏、屏幕驱动板、原子镜、相框、HDMI 连接线、8 G 以上内存卡 、读卡器 、无线网卡(我使用的是 2B 无自带无线,如果不怕线多可以省略)、热熔胶枪(固定用)
安装 Raspbian
国内高速下载地址,本文使用有桌面系统版
---desktop: https://mirrors.tuna.tsinghua.edu.cn/raspbian-images/raspbian/images/
---full: https://mirrors.tuna.tsinghua.edu.cn/raspbian-images/raspbian_full/images/
---lite: https://mirrors.tuna.tsinghua.edu.cn/raspbian-images/raspbian_lite/images/
烧录系统
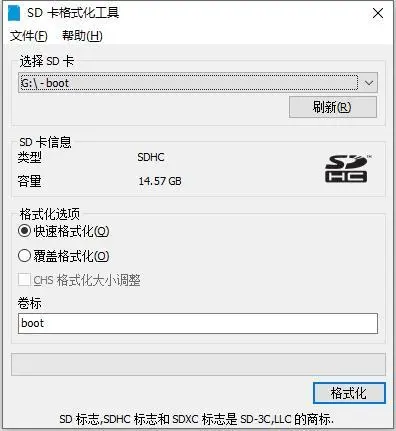
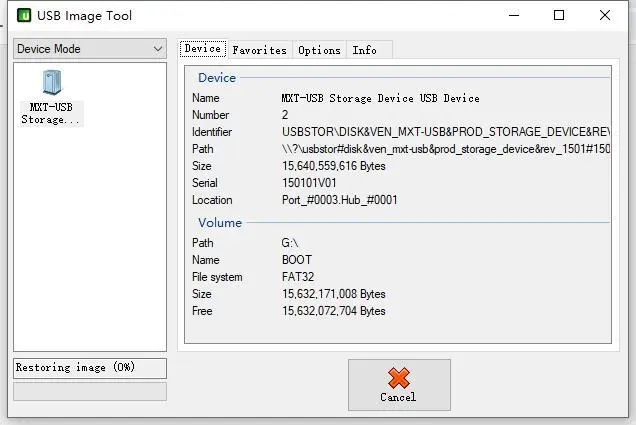
使用 SD Card Formatter 格式化内存卡,再使用 USB Image Tool 写入镜像
开启 SSH 和连接 WIFI
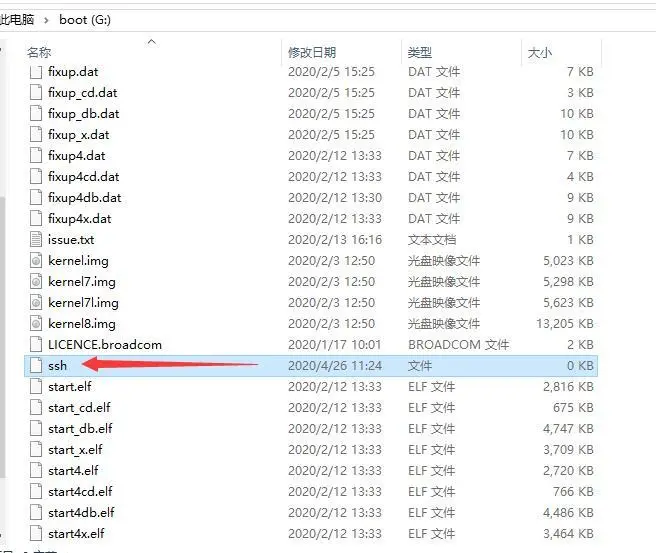
将SD卡连接到电脑上并打开,直接新建 ssh 文件(无后缀)即可。
把免驱无线网卡插上去,使用 WIFI 连接。参考树莓派实验室的文章,方法如下:
在 boot 分区,也就是树莓派的 /boot 目录下新建 wpa_supplicant.conf 文件,按照下面的参考格式填入内容并保存 wpa_supplicant.conf 文件。
country=CN
ctrl_interface=DIR=/var/run/wpa_supplicant GROUP=netdev
update_config=1

network={
ssid="WiFi-A"
psk="12345678"
key_mgmt=WPA-PSK
priority=1
}

network={
ssid="WiFi-B"
psk="12345678"
key_mgmt=WPA-PSK
priority=2
scan_ssid=1
}
说明以及不同安全性的 WiFi 配置示例:
#ssid:网络的ssid
#psk:密码
#priority:连接优先级,数字越大优先级越高(不可以是负数)
#scan_ssid:连接隐藏WiFi时需要指定该值为1
如果你的 WiFi 没有密码
network={
ssid="你的无线网络名称(ssid)"
key_mgmt=NONE
}
如果你的 WiFi 使用WEP加密
network={
ssid="你的无线网络名称(ssid)"
key_mgmt=NONE
wep_key0="你的wifi密码"
}
如果你的 WiFi 使用WPA/WPA2加密
network={
ssid="你的无线网络名称(ssid)"
key_mgmt=WPA-PSK
psk="你的wifi密码"
}
如果你不清楚 WiFi 的加密模式,可以在安卓手机上用 root explorer 打开 /data/misc/wifi/wpa/wpa_supplicant.conf,查看 WiFi 的信息。
在路由器看到了树莓派的IP,使用 SSH 软件连接。默认用户是 pi 密码为 raspberry
换国内源
在路由器找到树莓派的 IP 并使用 SSH 软件连接,更换一下清华源。其他系统可以上 https://mirrors.tuna.tsinghua.edu.cn/help/raspbian/ 查看更换方法。
# 编辑 `/etc/apt/sources.list` 文件,删除原文件所有内容,用以下内容取代:
deb http://mirrors.tuna.tsinghua.edu.cn/raspbian/raspbian/ buster main non-free contrib
deb-src http://mirrors.tuna.tsinghua.edu.cn/raspbian/raspbian/ buster main non-free contrib

\# 编辑 `/etc/apt/sources.list.d/raspi.list` 文件,删除原文件所有内容,用以下内容取代:
deb http://mirrors.tuna.tsinghua.edu.cn/raspberrypi/ buster main ui
注意:网址末尾的raspbian重复两次是必须的。因为Raspbian的仓库中除了APT软件源还包含其他代码。APT软件源不在仓库的根目录,而在raspbian/子目录下。
编辑镜像站后,请使用sudo apt-get update命令,更新软件源列表,同时检查您的编辑是否正确。
安装魔镜
sudo apt-get update
sudo apt-get upgrade
sudo rpi-update
curl -sL https://deb.nodesource.com/setup_10.x | sudo -E bash -
sudo apt install -y nodejs
git clone https://github.com/MichMich/MagicMirror
cd MagicMirror/
npm install
npm start
然后屏幕会出现 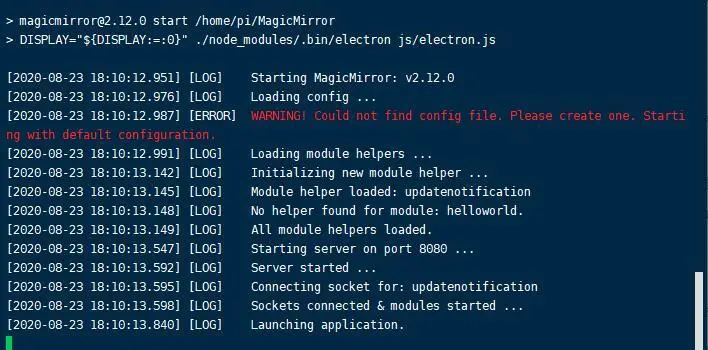
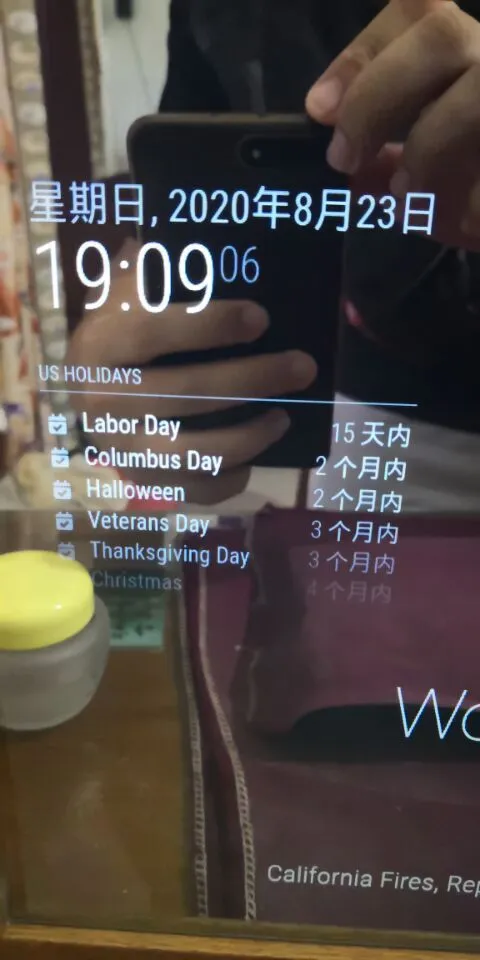
这时候把/home/pi/MagicMirror/config/config.js.sample 的改成config.js 再运行npm start ,如图 
其他设置
设置显示器垂直显示
sudo nano /boot/config.txt
#在最后添加
# Rotate display vertically
display_rotate=1
设置不息屏
#2B设置如下
sudo vi /etc/lightdm/lightdm.conf
#找到[SeatDefaults]段下的’xserver-command’,取消注释,修改为如下:
#xserver-command=X 将这一行修改为
xserver-command=X -s 0 -dpms
#保存后重启

#3B设置如下
sudo nano/etc/xdg/lxsession/LXDE-pi/autostart
#并将以下内容添加到文件的底部
@xset s noblank
@xset s off
@xset -dpms
#保存并退出
修改成中文显示
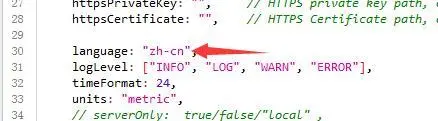
在/home/pi/MagicMirror/config/config.js 里修改将 language 改成“zh-cn”即可。
修改天气信息
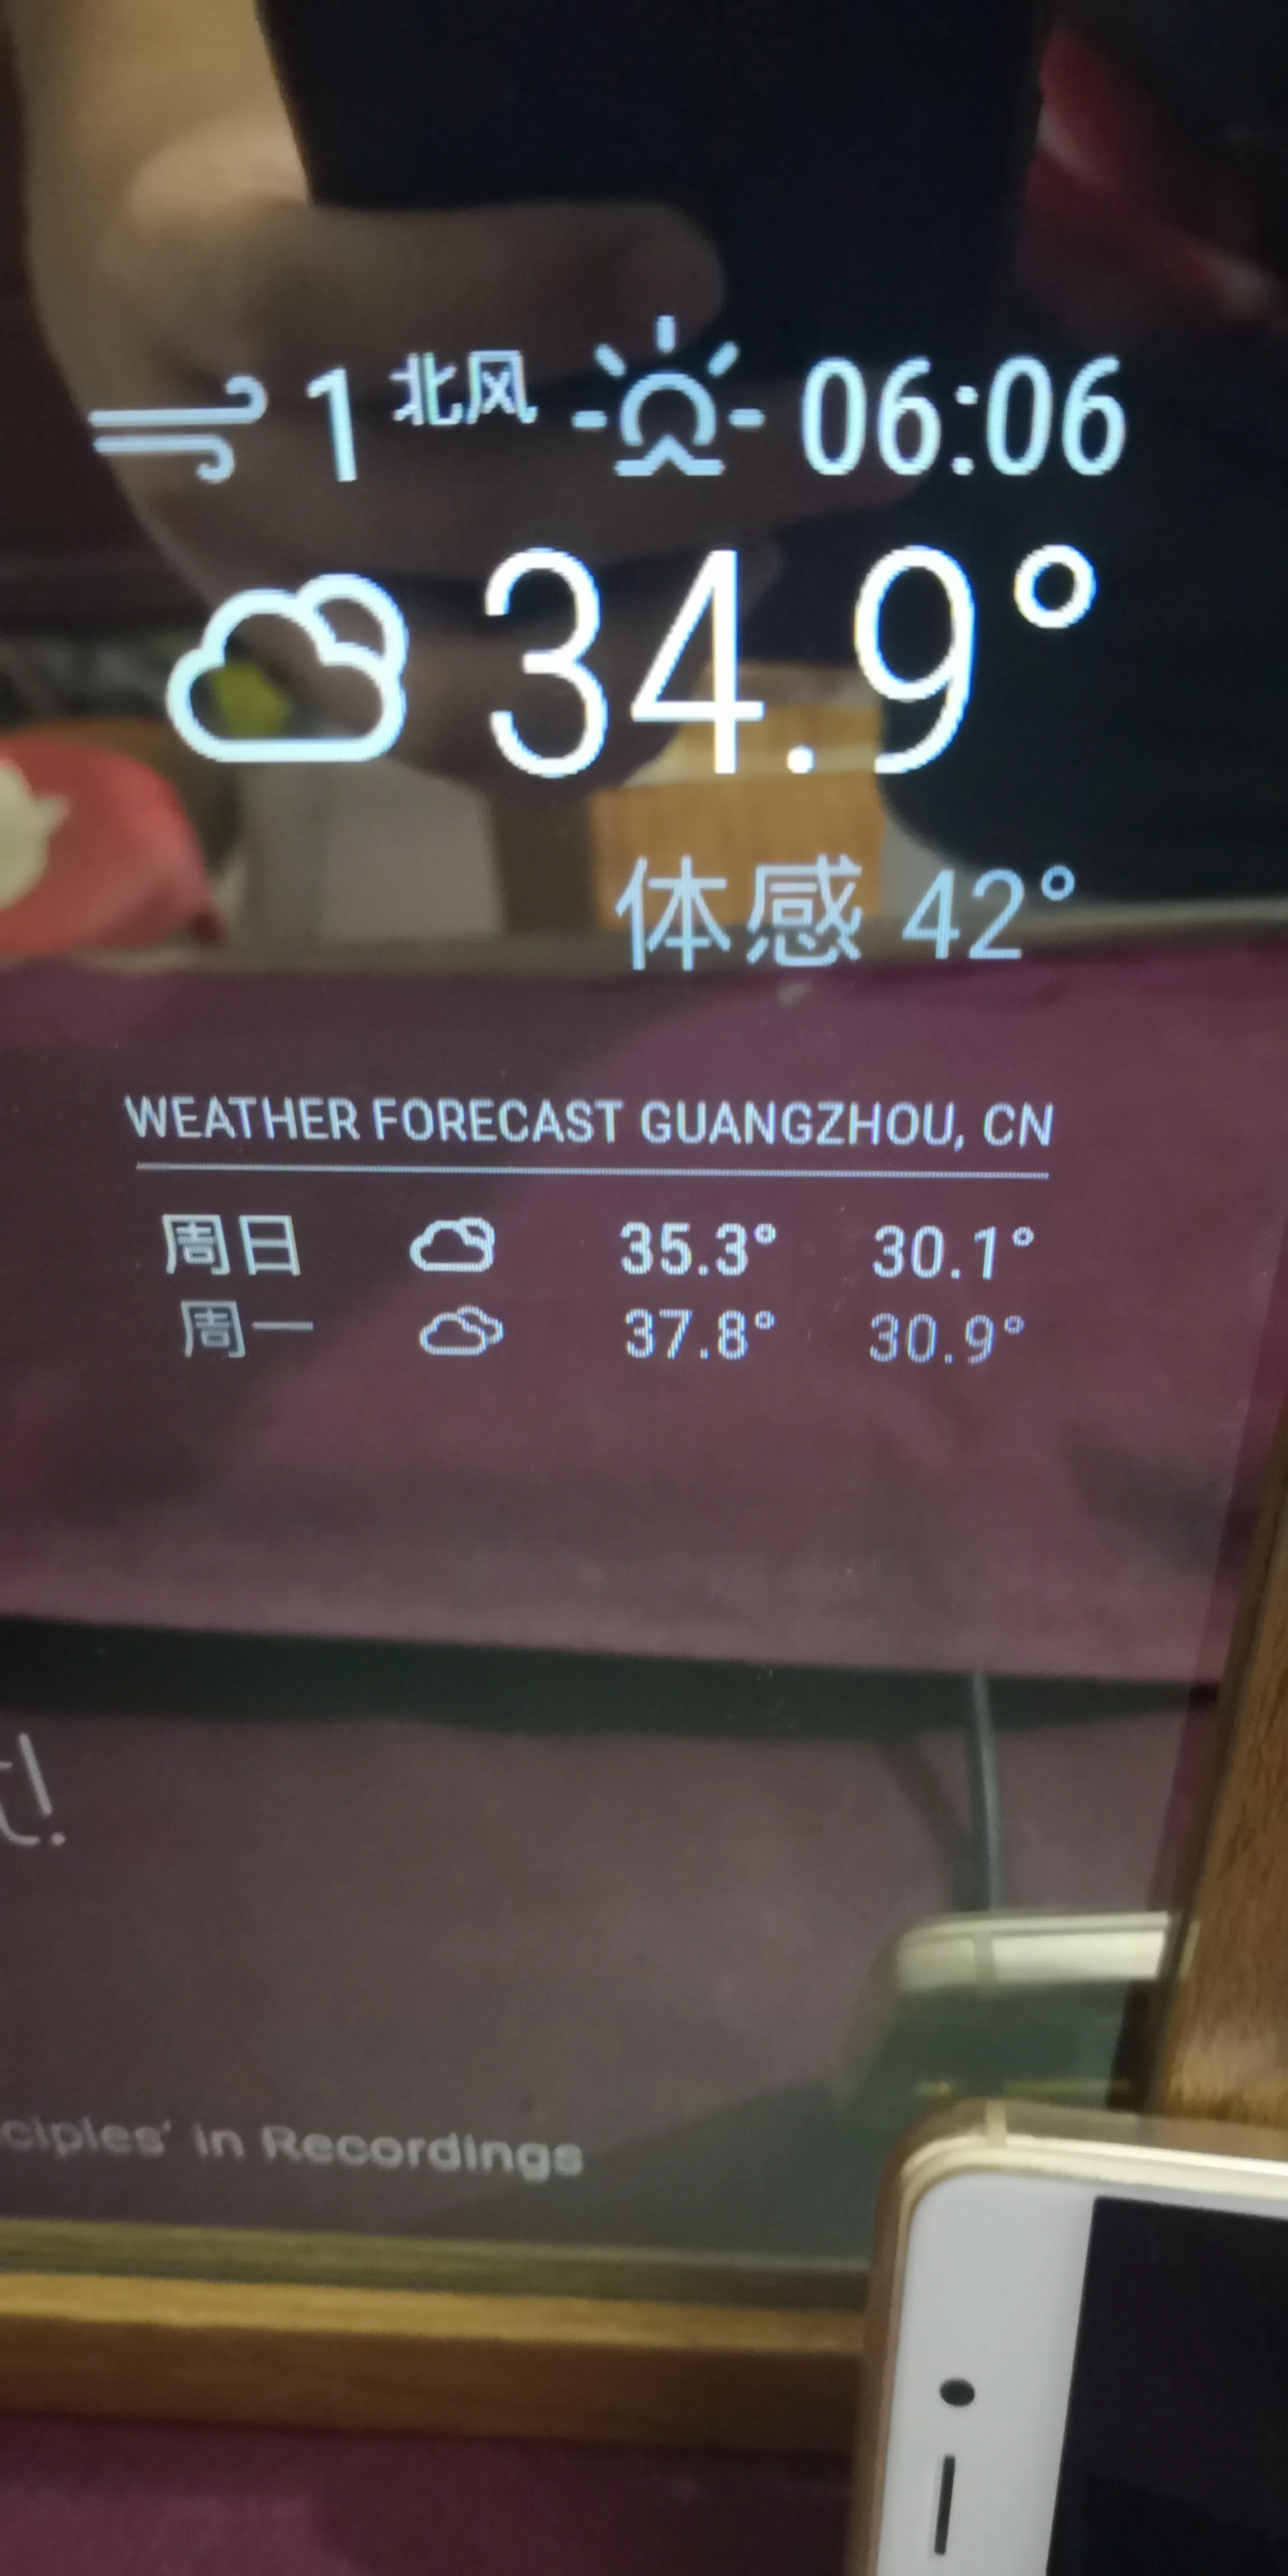
同样的在 config.js 文件里面修改,在这里注册api,有谷歌人机验证。

把 API、location 和 location ID 填好后效果如图:
修改底部新闻
修改 RSS 订阅即可,RSS 订阅源可以百度找
问候语设置
配置文件位置:/home/pi/MagicMirror/modules/default/compliments/compliments.js

设置中文问候语需要安装中文输入法
sudo apt-get install scim-pinyin
安装完成后重启。
添加小地球
在终端输入
cd ~/MagicMirror/modules
git clone https://github.com/mykle1/MMM-EARTH.git
cd ~/MagicMirror/modules/MMM-EARTH
npm install
然后在 config 里面 modules 模块里添加下面一段代码
{
module: "MMM-EARTH",
position: "bottom_center",
config: {
mode: "Natural",
rotateInterval: 15000,
MaxWidth: "50%",
MaxHeight: "50%",
}
},
运行,地球就显示出来了
日程表
在终端输入
cd ~/MagicMirror/modules
gitclone https://github.com/pinsdorf/MMM-WeeklySchedule.git
cd ~/MagicMirror/modules/MMM-WeeklySchedule
npm install
#然后再config里面modules模块里添加下面一段代码
{
module: "MMM-WeeklySchedule",
position: "top_left",
header: "Household chores",
config: {
schedule: {
timeslots: [ "Feed thefish", "Set the table", "Take out the trash","Hoover living room" ],
lessons: {
mon: ["Bart", "Marge","Homer", "Lisa" ],
tue: ["Lisa", "Bart", "Marge", "Homer" ],
wed: ["Homer", "Lisa", "Bart", "Marge" ],
thu: [ "Marge","Homer", "Lisa", "Bart" ],
fri: ["Bart", "Marge","Homer", "Lisa" ]
}
},
updateInterval: 1 * 60 * 60 * 1000,// every hour
showNextDayAfter: undefined
}
},
即可,参数修改说明:
updateInterval 为内容更新频率,1*60*60*1000ms=1h,timeslot和lessons中引号里面为字符串,可以为各种形式。
后记
添加模块的方法是git到本地然后install一下,magicmirror2第三方模块:https://github.com/MichMich/MagicMirror/wiki/3rd-Party-Modules
镜子上模块多了之后难免会有点显得乱,通过模块中的position设置所在位置,“Ctrl+减号”缩小字体,“Ctrl+shift+加号”放大字体。